The ONLY Time Tested Way to Lay Model Railroad Track 2
The most important things to remember are to put the holes in for the track nails on the track itself and then hammer the nails into place.
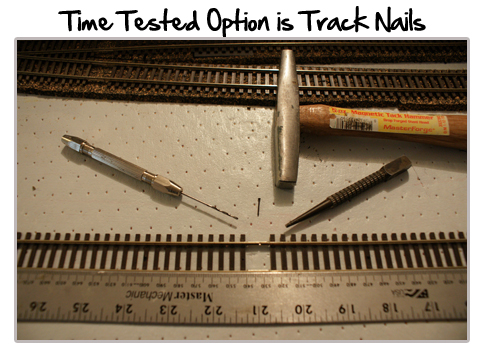
On tracks such as the Atlas Flex Track, the ties are smooth on the top but when you flip it over there are tiny little dimples in the back of the track. We need to drill those out before we can install the spikes. In order to drill the holes, the best item to use is a pin vise with a number 65 bit installed.
Setting our track on a piece of wood such as bench work provides a nice surface to do the drilling and ensures your holes are being drilled on a stable area.
Instructions:
First off, take the bit put it into the dimples of the flipped over the track and drill the holes. Once the holes are drilled you can flip over your track and place it on the layout, where you have drawn the scales to be placed. Once you have placed it down, insert your track nails into the holes and use a nail set and a tack hammer to drive the nails in and secure it into place.
Then just go on down the lines and insert your track nails into the rest of the track and secure you’re the track to the bottom of your model train layout.
Useful Advice:
- Pin vises and track nails can be found at most all hobby shops
- You don’t want to drive the nail so far that it bends the tie
- For a faster way to insert track nails use Dremel tools instead of a pin vise and tack hammer
- If you ever want to change the arrangement of your track, you can simply use some needle nose pliers and pull out the nails from the track ties and you are free to move the tracks around.
After laying down the track, the next thing to do is follow these top 10 trackwork tips: